Little Four-Patch Table Runner
Three four-patch blocks and a narrow border make a manageable runner, with exact cutting and assembly checkpoints.
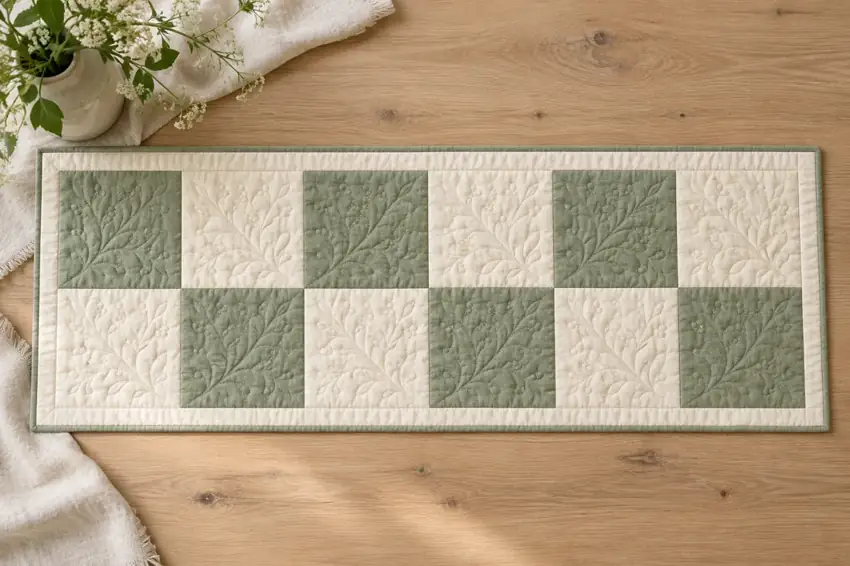
Written draft - maker testing pending. Cutting and assembly calculations have been reviewed; this design has not been physically sewn and tested.
Measurements
Pieced top: 20.5 x 8.5 in before quilting and binding. The bound runner varies slightly after quilting, squaring and washing; this is not a verified finished sample measurement.
Materials & tools
- Quilting cotton A (sage) and B (ivory): allow one fat quarter of each, at least 18 x 20 in usable fabric. Planning allowance only; usage has not been measured.
- Border cotton C (dusty blush): one fat quarter with at least one usable dimension of 20.5 in, or a 1/4-yard cut across at least 40 in usable width.
- Backing: at least 28.5 x 16.5 in; batting at least 28.5 x 16.5 in, or more if required by your quilting setup.
- Binding: two strips 2.5 x 40 in, with at least 70 in usable continuous binding after joining.
- Sewing machine, coordinating thread, rotary cutter and mat, quilting ruler, iron, pins or clips, basting supplies, quilting foot and hand-sewing needle.
Exact cutting list
| Material | Quantity | Cut size |
|---|---|---|
| Fabric A | 6 squares | 3.5 x 3.5 in |
| Fabric B | 6 squares | 3.5 x 3.5 in |
| Border C - sides | 2 strips | 1.5 x 6.5 in |
| Border C - top/bottom | 2 strips | 1.5 x 20.5 in |
| Backing and batting | 1 rectangle each | 28.5 x 16.5 in minimum |
| Binding | 2 strips | 2.5 x 40 in |
Step-by-step construction
- Cut the patchwork12 squares; 3 blocks
Cut six A and six B squares at 3.5 x 3.5 in. For each of three blocks, arrange top row A-B and bottom row B-A.
- Sew each four-patchEach block: 6.5 x 6.5 in
Sew the two squares in each row with right sides together and a 1/4-in seam. Press toward the darker fabric. Join the two rows, nesting the middle seam. Press and check each block.
- Join the three blocksCenter: 18.5 x 6.5 in
Place all blocks in the same orientation in one horizontal row. Join with two 1/4-in seams, matching the middle horizontal seam between blocks. Press the joining allowances.
- Add the short-end bordersUnit: 20.5 x 6.5 in
Sew a 1.5 x 6.5-in C strip to each short end of the center with 1/4-in seams. Press toward the borders.
- Add the long bordersTop: 20.5 x 8.5 in
Sew a 1.5 x 20.5-in C strip to the upper and lower long edges with 1/4-in seams. Press toward the borders.
- Prepare the quilt sandwich
Press the top flat. Cut backing and batting 8 in larger than the top in both directions, giving about 4 in extra on every side. Follow the batting maker's requirements, and allow more backing if your quilting setup requires it. Lay the backing wrong side up, batting above it, then the top right side up. Smooth without stretching and baste from the center outward.
- Quilt and square
With a walking foot or another method suited to your machine, quilt simple straight lines beside the seams or a balanced grid. Follow the batting label's maximum spacing between quilting lines. Check the back for folds while working. After quilting, trim excess backing and batting flush with the squared quilt top; do not trim a fixed amount off the top simply to force a nominal size.
- Prepare the binding
Join the two 2.5-in-wide binding strips with a diagonal seam, right sides together. Trim that seam to 1/4 in, press it open, then press the long strip in half lengthwise with wrong sides together. Verify the usable length listed for your project before attaching it. Start on a straight edge, away from a corner, leaving about 6 in of the starting binding tail unattached for the final join. Align the binding's raw edges with the quilt's front edge and sew with a 1/4-in seam allowance. Arrange strip joins away from corners.
- Turn each binding corner
Stop the seam 1/4 in before a corner and backstitch. Fold the unattached binding upward at 45 degrees, then fold it back down along the next edge so the new fold aligns with the corner. Begin sewing the next side at its top edge. Repeat at each corner, taking care not to stitch through an unintended tuck.
- Join the binding ends
As you return to the starting point, stop sewing with a gap of about 6 in between the attachment seams; keep both loose binding tails available. Lay those ends flat along the quilt edge, allowing an overlap equal to the unfolded binding width: 2.5 in here. Cut to that overlap, unfold the ends, and place them at right angles, right sides together. Sew a diagonal seam. Before trimming the seam, check that the binding lies flat around the gap without twisting. Trim to 1/4 in, press, refold and finish stitching the binding across the gap.
- Finish and record
Fold the binding over the outer edge to the back, covering the attachment seam. Hand-stitch it securely to the backing, forming neat corner miters. Remove any remaining basting. Check the seams and binding, then wash only as permitted by the fabrics and batting. Record the actual finished measurements. Quilting, squaring and washing can change size; these drafts do not promise an exact bound size.
Three blocks, one small runner
Make three identical four-patch blocks, join them in one horizontal row and frame the center with a narrow border. Each block contains two A squares and two B squares. The simple construction gives you several short checkpoints before the long seams are sewn.
This is an original written draft. Its cutting and seam calculations have been reviewed, but a physical runner has not been sewn or measured. The layout diagram shows fabric placement, not a photograph of a tested sample.
Check the 1/4-inch seam before cutting everything
Cut on the straight grain and use a consistent 1/4-in piecing allowance. A test pair of 3.5-in squares should measure 6.5 x 3.5 in after joining and pressing. If it does not, investigate before building all three blocks.
The border cuts assume the center reaches its stated measurement. Measure the actual center through the middle before attachment. If it differs, fix the underlying seam or cutting problem rather than forcing a short border to stretch or easing a long one into waves.
Make and arrange the four-patch blocks
For every block, arrange the top row A-B and the lower row B-A. Sew each two-square row, pressing its allowance toward the darker fabric. The row allowances point in opposite directions when the block is arranged, helping the center intersection nest. Join the two rows, matching that intersection.
Each block should measure 6.5 x 6.5 in before joining. Place all three in the same orientation. Across the runner, the top line becomes A-B-A-B-A-B and the lower line B-A-B-A-B-A. Join the blocks with two 1/4-in vertical seams to make an 18.5 x 6.5-in center.
Add the short side borders first
Attach one 1.5 x 6.5-in border strip to each short end of the center. These two seams each consume 1/2 in of combined width, so the new unit measures 20.5 x 6.5 in. Press the allowances toward the borders.
Then attach the two 1.5 x 20.5-in strips along the top and bottom long edges. The complete top measures 20.5 x 8.5 in before quilting. A 1.5-in cut border contributes 1 in between its seam line and its outer seam-allowance line; keep the outer allowance rather than trimming it away.
Quilting, binding and useful notes
The unquilted top perimeter is 58 in. Prepare at least 70 in of usable continuous binding. Two 40-in strips, joined diagonally, provide a practical allowance when the full stated width is usable; check the prepared length instead of assuming a printed fabric width excludes selvages.
The backing and batting cuts give about 4 in extra all around. A different quilting setup may require more. Quilt a small, balanced design according to your batting spacing instructions. After finishing, record the actual bound size and any shrinkage; do not present the nominal pieced-top calculation as a maker-tested result.